🎧 Galaxy Buds3 & Buds3 Pro — Coupling & Reset
Last Updated: January 2026 • Post-repair procedure for the Buds3 series (self-repair)
After replacing an earbud on the Galaxy Buds3 or Galaxy Buds3 Pro, two steps make the buds usable again: coupling (re-linking the left and right earbuds so they act as one) and a reset (clearing the test history from the replacement). Unlike earlier Galaxy Buds, Buds3 coupling uses the button on the charging cradle — not the earbud touch panels.
Have an older model? See the Galaxy Buds / Buds+ / Buds Live / Buds Pro / Buds2 repair guide.
1. Coupling — the L-R connection
Coupling connects the two earbuds to each other so they work as one unit. You need it when an earbud has been replaced, or when the buds only allow one or the other earbud to connect at a time.
Steps
- Insert the new earbuds into the charging cradle together with the existing earbuds, and make sure each one is aligned correctly in its slot.
- Open the cradle cover.
- Press and hold the cradle button until the indicator light flashes green — more than 7 seconds.
- If the indicator light keeps flashing red, the earbuds did not couple. Remove them from the cradle, reinsert them correctly, and run the coupling process again.
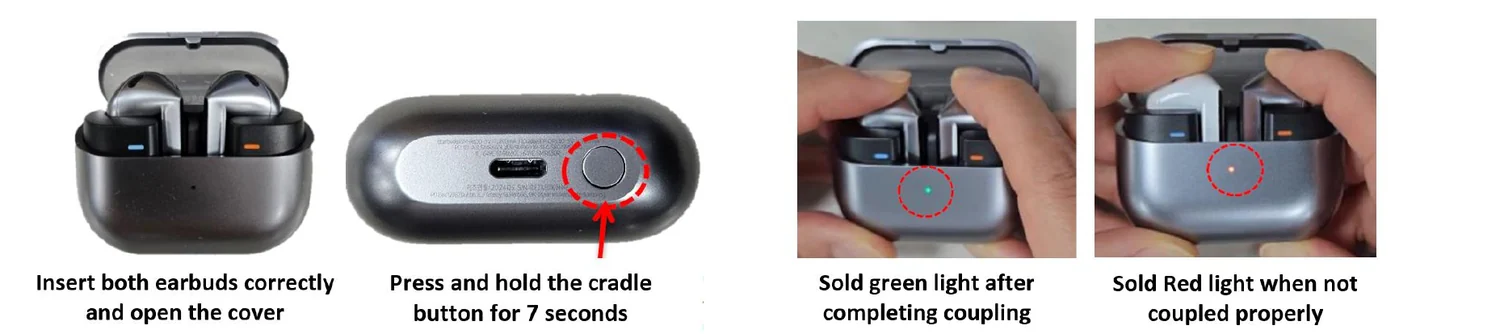
| Indicator light | Meaning |
|---|---|
| Flashing green | Coupling in progress — keep holding the cradle button |
| Solid green | Coupling completed successfully |
| Solid / flashing red | Earbuds are not coupled properly — remove them from the cradle, reinsert them aligned correctly, and try again |
2. Reset — clear the test history
When you finish testing or a replacement, perform a reset so the test history is removed and the earbud settings return to their defaults.
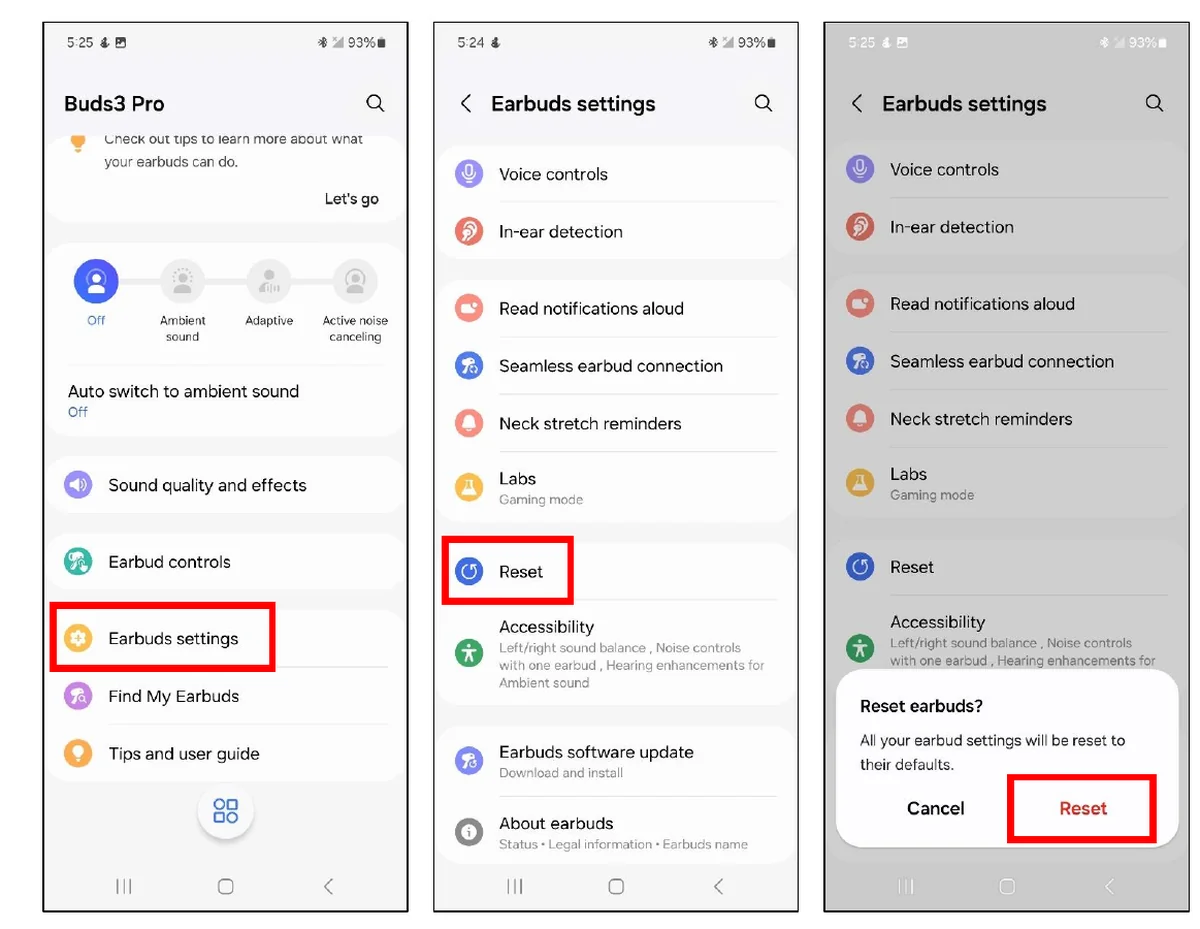
- Make sure the buds are paired to a (test) phone.
- Open the Galaxy Wearable app and select the Buds device.
- Go to Earbuds settings → Reset.
- Tap Reset again on the “Reset earbuds?” confirmation dialog.
Galaxy Buds3 Coupling & Reset FAQ
How is Buds3 coupling different from older Galaxy Buds?
On Galaxy Buds, Buds+, Buds Live, Buds Pro and Buds2 you couple by pressing and holding both earbuds’ touch panels. On the Buds3 series you instead press and hold the physical button on the charging cradle for more than 7 seconds, with the lid open and both earbuds inserted.
What does "coupling" actually do?
Coupling is the left-to-right (L-R) connection between the two earbuds. You need it when an earbud has been replaced, or when the buds only let one earbud connect at a time. After coupling, the two earbuds work as one unit again.
The cradle light keeps flashing red. What now?
A red light means the earbuds did not couple. Take both earbuds out of the charging cradle, check they are seated and aligned correctly (left in the left slot, right in the right), close and reopen the lid, then press and hold the cradle button again for more than 7 seconds.
Do I have to reset the earbuds after a repair?
Yes. After testing or replacement, Samsung’s self-repair guide says a reset should be performed to clear the test history. Pair the buds to a phone, open Galaxy Wearable, then go to Earbuds settings → Reset → Reset.
Will resetting delete my music or Bluetooth pairing to the phone?
Reset returns the earbud settings (equaliser, touch controls, noise-control preferences, etc.) to their defaults. It does not touch anything stored on your phone; if the phone stops recognising the buds afterward, remove them from Bluetooth settings and pair again through Galaxy Wearable.
Procedures and images adapted from the Samsung Electronics America “Buds3 Series Hearables Coupling & Reset Guide — Guide for Self-Repair” (July 2024). This page is an independent reference; for warranty repairs and genuine parts, visit an authorised Samsung service centre.